Showing posts with label geekery. Show all posts
Showing posts with label geekery. Show all posts
3 April 2011
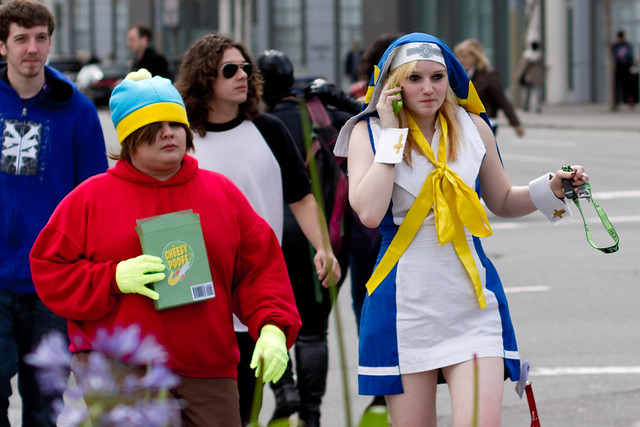
15 February 2011
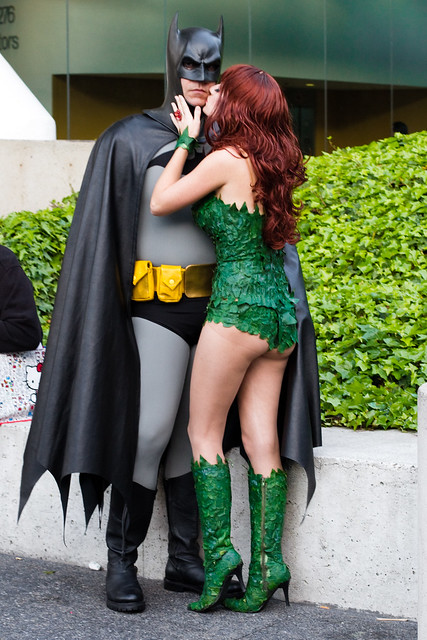
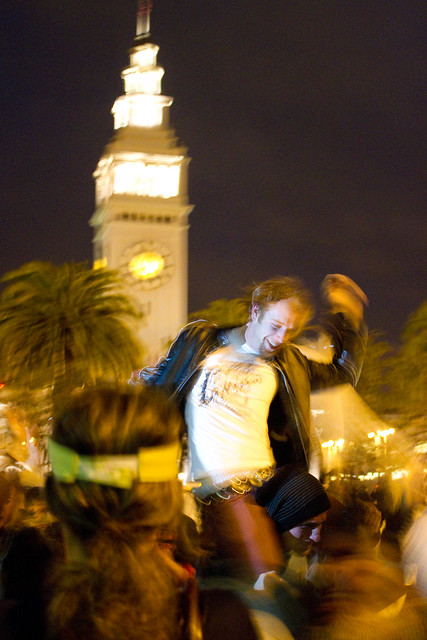
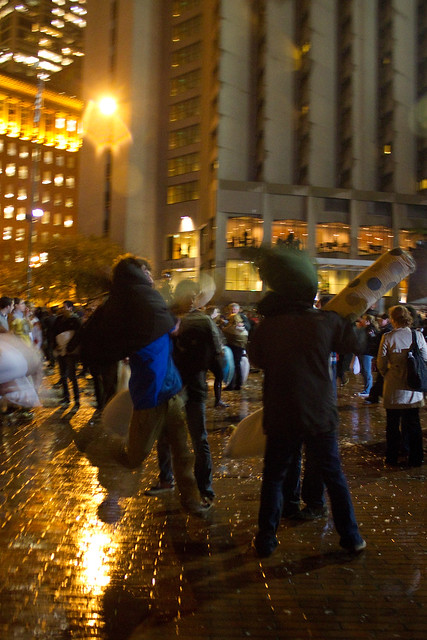
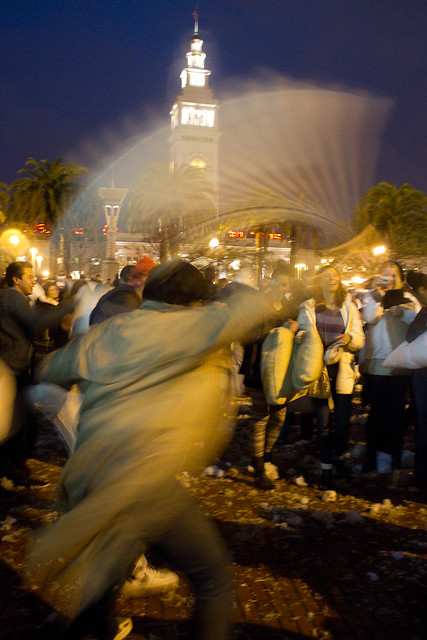
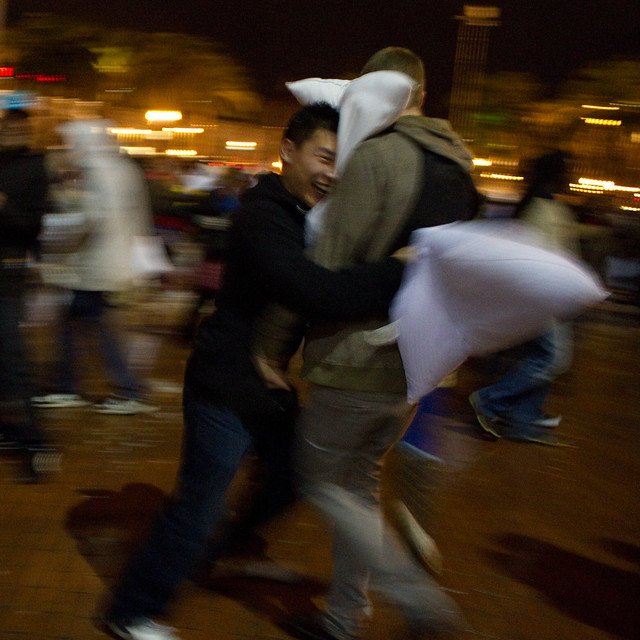
Valentine's Day Pillow Fight, San Francisco, 2011
San Francisco is full of madness. I love it :D
Video is here: http://vimeo.com/19964096. Full set of photos is here.
14 July 2010
smarter than anybody
Small cars, downtown San Francisco.
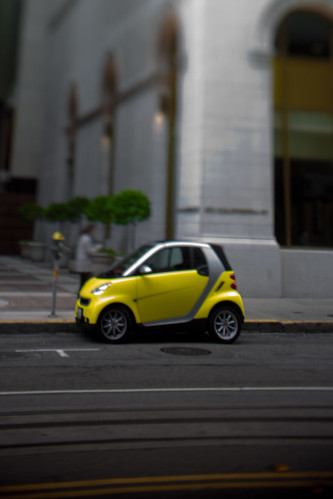

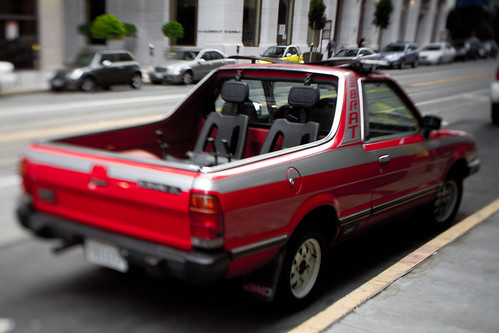
Of note - the photos were taken with Bendycam, the newest DIY tilt-shift lens in my stable of strange optical devices:
Tutorial and other goodies coming soon.
Of note - the photos were taken with Bendycam, the newest DIY tilt-shift lens in my stable of strange optical devices:
Tutorial and other goodies coming soon.
19 April 2010
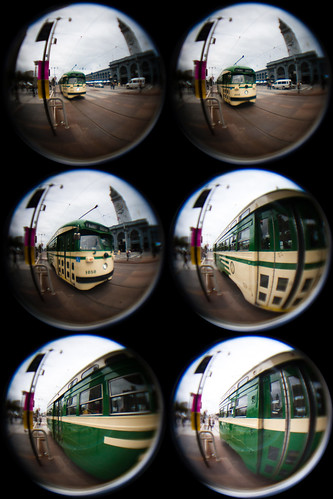
The fisheye tin cam
[You can find other DIY photography projects here]
[Also I'd like to shout out to the good folks at Photojojo - if you like photo goodies, I'd recommend perusing their catalog of awesome. *]
[Also I'd like to shout out to the good folks at Photojojo - if you like photo goodies, I'd recommend perusing their catalog of awesome. *]
Fisheye lenses are insanely fun to shoot with. They allow you to shoot at very wide angles - wide enough lenses will get people standing right next to you into the shot. I've always loved the wide angle look in videos, and I thought it'd be an awesome exercise in redundant and needless hackery to build my own.
Here's the gloriously ugly result:
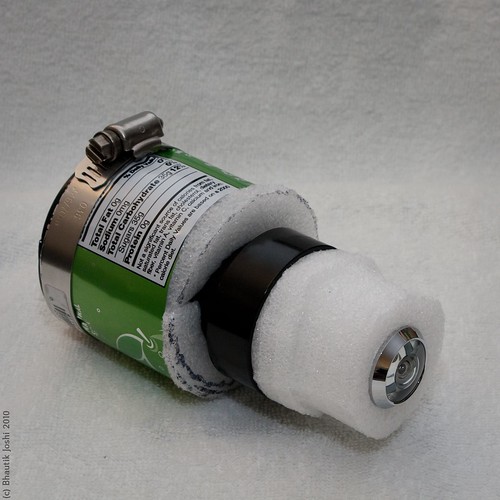
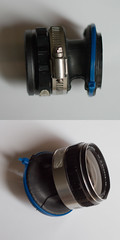
Built using a fisheye peephole as the main lens element and a decapitated soda can as the lens body (!), this attaches directly to my SLR camera. For well under US$20, I ended up with a lens that has nearly a 180-degree field-of-view, adjustable focus, a canon EOS mount, and due to it's stylish and sleek exterior, can generate limitless amounts of
Step 1: Research!
The cheapest and easiest to get fisheye lens out there at the moment is the garden variety door peephole lens. These simple optical devices can be picked up cheaply at your local hardware store. I picked up mine for US$6; it offered a huge field of view (nearly 180 degrees).As I discovered in my previous hacks, individual lenses are hard to directly transplant from one device to another. Often an intermediate lens is required to refocus the image so it hits the sensor/film correctly. The peephole lens couldn't be used directly with the SLR - like the phone-o-scope, it needed a teleconverter is needed to magnify the small image at the end of the fisheye barrel, and bring it into focus at the image sensor.
A number of good tutorials have gone over the method of using an existing, standard lens as a teleconverter. That's where I started:
First attempt
...and while this works, I didn't like the idea of having a complex lens in-between the fisheye and the camera. Modern lenses have many internal elements, each one dimming the image coming from the fisheye and leading to low-contrast images. I wanted to build a lens that would remove the complex in-between lens and replace it with a simple one that wouldn't lose quite as much light.
Step 2: Testing
I needed to couple the fisheye lens with something that would magnify the image coming out of it, and space it so that it would form a good image at the sensor. Rummaging around in my parts box, I found an old, single element projector lens that came from an old 35mm slide projector. These are pretty pretty easy to find, and I've seen them a lot at garage sales.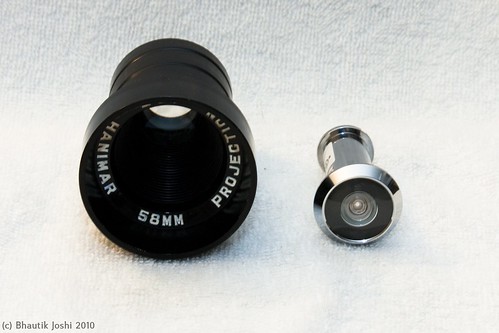
Left: projector lens, right: fisheye lens
I took the body cap off my camera, and held the two lenses in front of the body. Looking through the viewfinder and experimenting with the lens positions, I was able to come up with an estimate for how far the lenses needed to be apart from each other and the camera body to make a reasonable image. Running around loosely holding lenses in front of the camera tends to be fraught with danger, however, so the next step was to build a permanent enclosure for them.
Step 3: Design
The materials list for the design:- Projector lens (US$3, second-hand)
- Door peephole lens (US$6, new from the hardware store)
- T-mount to EOS adapter (US$9 new from eBay, but you can use a drilled out body cap instead which would be ~US$4)
- Soda can (US$1)
- Packing foam (US$0)
- Cardboard stopper rings (US$0)
- Plumbing clip (US$0.5)
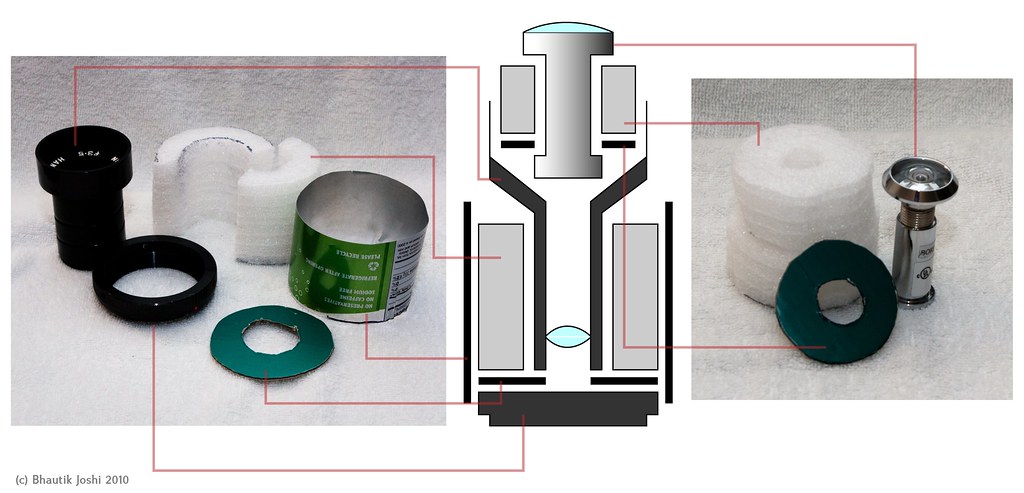
The design centres around having two main components - a lower enclosure for holding the projector lens, and an upper slot for the fisheye lens.
In the design, the lens attaches to the camera using a T-mount to EOS adapter. It turns out that the adapter I was using had nearly exactly the same diameter as a soda can, so I decided to use that as my lens body. To hold the projector lens firmly in place in the can, I made use of two pieces of packing foam, cut into halves of a cylindrical tube that fit around the projector lens. Since the foam I was using is not completely opaque, I also inserted a cardboard ring cut into the shape of a donut at the base of the foam cylinder to stop light leaks.
A similar principle is used to fit the fisheye lens into the projector lens mouth. Foam discs that are a little larger than the diameter of the projector lens mouth are cut out; in the centre of this a hole is made so that the fisheye lens fits snugly inside them. Another cardboard stopper is placed at the base of the foam to stop light leaks.
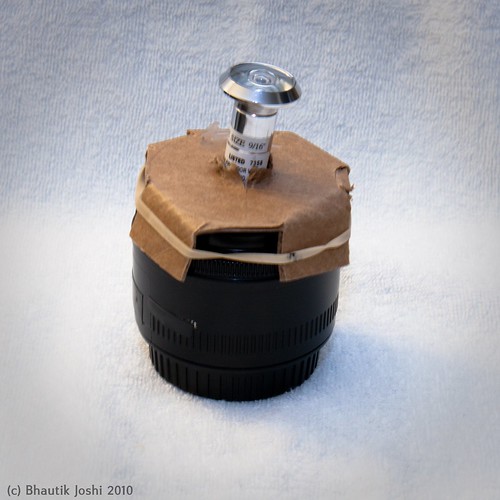
Step 4: Building the tin cam
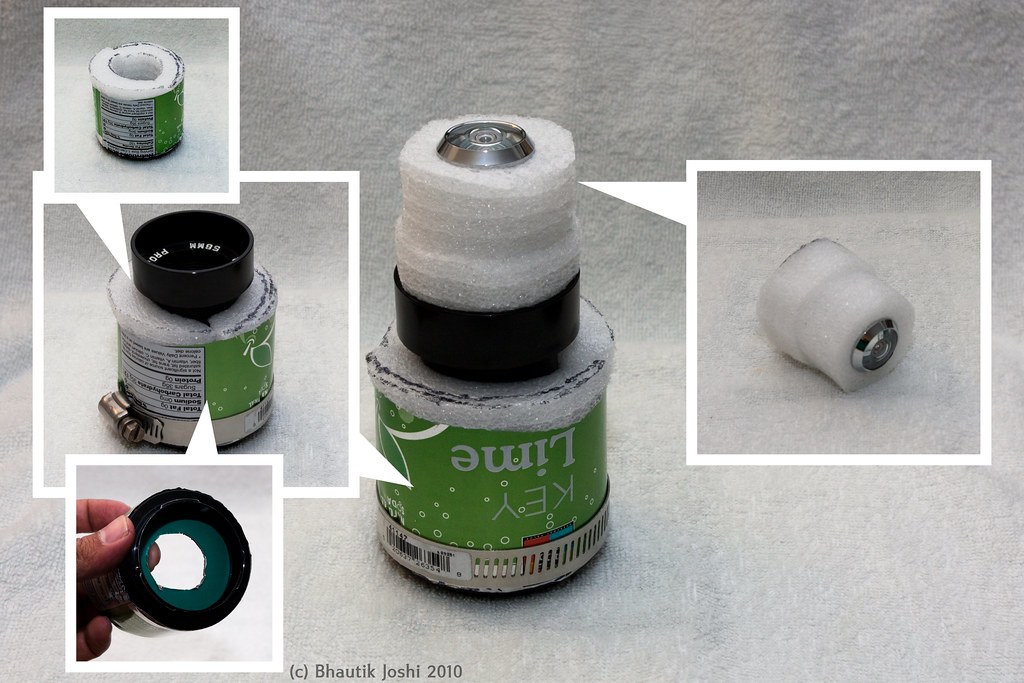
Actual assembly
Assembly was pretty straightforward. The t-mount is inserted into the can first, and the stopper ring on top of it. The foam cylinder halves are inserted next. To keep things extra secure, a plumbing clip is wrapped around the mount end of the can. The projector lens was carefully inserted into the centre of the foam cylinder tube. The projector lens that I had has a screw-thread, so I was able easily twist it into place. This added an extra bonus - turning the projector lens unscrews it, allowing for racking the lens back and forth - which means that the lens can be adjusted for focus.
Most door fisheye lenses come in two parts - a lower part which goes into the back of the door, and an upper part which screws into it from the front side of the door. Separating the lens into these two halves, the cardboard stopper is slid it on to the lower half. The foam discs are slid on next, and then the top half of the fisheye is screwed back in. This whole assembly is snugly fitted into the mouth of the projector lens, and then the build is complete!
Final build
Even if your projector lens doesn't have a thread, you can still adjust the focus by turning the upper half of the fisheye lens - unscrewing it a little with lengthen the lens body, allowing you to finely focus it.
Step 5: Going nuts
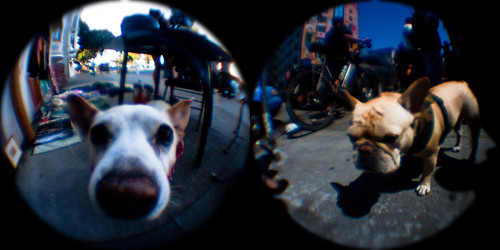
woof!
The fisheye lens is ludicrously fun to shoot with. If you can, get in close to your subject - you'll be surprised how close you can get and still have your surroundings in the frame. Pets are always awesome for fisheye photos, especially if they're happy to stick their nose into the lens.
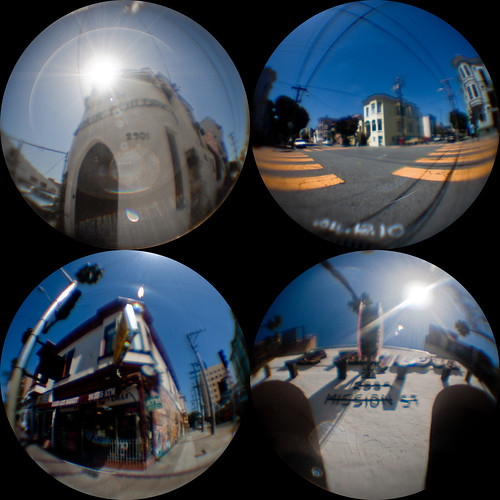
Mission District
The lens combination makes saturated, contrasty pictures. As the results show, door fisheye lenses were never meant for even vaguely serious photography, and individual images don't stand up well to close inspection. In future revisions I think I might experiment with adding in an aperture to crank up the f-stop and perhaps reduce some of the sharpness and colour artefacts.
However, if you take a few of the fisheye pictures and arrange them into a grid, you can use them to tell a story or paint a picture of a place with a few images. In all of these shots I've cropped the images to squares, and then used a circle mask to get a clean circular crop around the edges of the pictures.
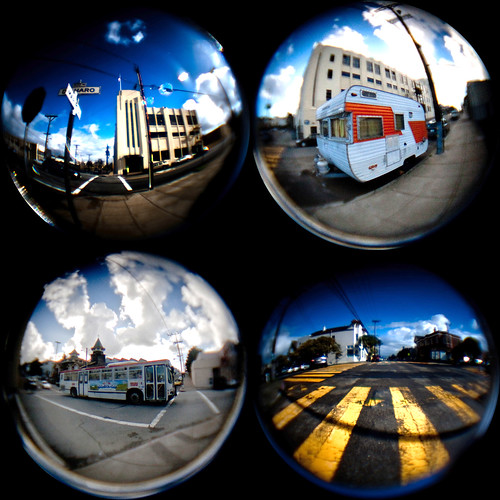
Potrero Hill Portraits
Go nuts with it, and get in close - I don't think you'll be disappointed :) You can find other fisheye tin-cam photos on flickr here.
fffffff-isheye!
*I keep this site free-as-in-beer, but shopping on the photojojo site via this link contributes in a small way to my needless-optics-gear-fund and makes for a very happy photo nerd.
5 April 2010

21 February 2010
20 February 2010
What English sounds like with just sounds and no meaning
A work colleague and I were discussing the other day the how English might 'sound' to someone who didn't understand the words. I'm used to frequently seeing impressions of other languages from native English speakers, but rarer to see is English speakers coming up with their own 'impressions' of English.
One of the first occurrences we came across was John Cleese, who developed a type of nonsense English and has used it to great comic effect. Have a listen to this interview on NPR, around the 8:50 mark, where he talks about this nonsense language he developed. He's also used it relatively recently:
The interesting thing about this clip is the confusion it brings about - it sounds and feels like understandable language, but is in fact complete nonsense. I've passed this on to a few people I know and some have reported that it makes them feel uncomfortable as it sounds like it should make sense but doesn't.
In the NPR interview linked above, John Cleese states Stanley Unwin and his Unwinese as his inspiration for his nonsense language. I hadn't known about Stanley Unwin before, and it turns out he's absolute master of gibberish - and very, very funny to boot:
It's also possible to speak grammatically correct English without making an any sense either. The late great Ronnie Barker delighted in messing around with pronunciation and spelling, to great comic effect:
And now for the final variation: grammatically correct, valid English that unintentionally doesn't make any sense. For example, see this classic spoof of the Turbo-Encabulator:
I think it's interesting that this low signal-to-noise-ratio style of speaking is instantly recognisable to anyone who has encountered people who speak a lot of needless business jargon. Observe this unintentionally hilarious clip from Microsoft COO, Kevin Turner, weighing in at 4 minutes 20 seconds:
If you take that same clip, and reduce it down to just business buzzwords, its 1 minute 49 seconds long - that's 42% buzzwords(!!):
I'll just leave this here:
22 December 2009
Bokeh Masters Kit Review
I was recently contacted by the always awesome Udi from diyphotography.net, and I was delighted when he sent one of his Bokeh masters kit in my direction to review.
[Udi is a DIY photography ninja and unlike my own clumsy attempts Udi has a knack for coming up with some elegant hacks.]

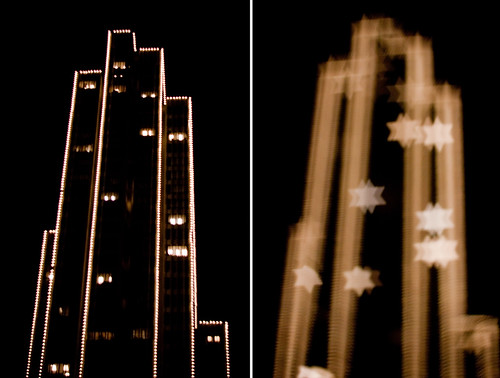
Star shaped bokeh from out-of-focus traffic downtown.
The basic idea of the kit is put a cutout shape in front of the camera lens, which shapes out-of-focus lights using the shape on the cutout [Optics nerd time: I'm not sure of the exact optics going on here, but what I'm guessing is that it masks the circle of confusion formed at the image plane with the cutout shape. Someone please correct me here if I'm wrong]. Udi took the idea of his DIY shaped bokeh and turned it into a product where you can swap in one of a number of pre-made cutouts.
What's in the box:
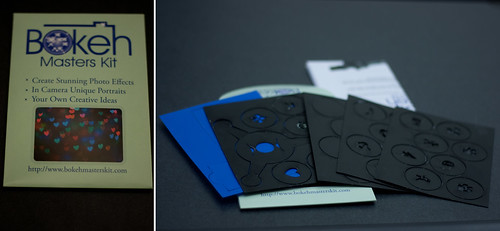
The masters kit comes with five pre-perforated sheets. Four of these contain the shaped cutouts, and the actual 'bokehtinator', which is used to mount the discs. Another sheet folds into a little box for storing the discs when they are not in use. A rubber-band is supplied so you can attach the bokehtinator to the camera itself.
When you first punch the discs out, you might get a feeling that the plastic is a bit on the flimsy side; in particular the folds bokehtinator seem like they might tear. However, after a two days of of testing I was pleasantly surprised to find that by just being mindful of not pulling along the fold lines it is indeed quite sturdy.

Attaching the bokehtinator is relatively simple - the tabs are folded around the lens and held in place with the rubber bands. A clever part of this design means that the focusing ring is still accessible for use, as opposed to the DIY cap-based designs which would prevent this. One thing that I quickly discovered was that I needed to attach the bokehtinator with a good 5mm gap away from the end of the lens to allow room for the focusing mechanism to work.
Learning to work with shaped bokeh:
I used my trusty Canon 450D along with a f1.8 50mm nifty fifty. To really make use of the bokeh effects, you need out-of-focus light sources. If your lens has a good, big depth-of-field than you might be disappointed - as the instructions in the kit say, for this to work you need the aperture wide open (i.e. low f-stop).
The sweet-spot for usage (as I understand it) is with portrait photography with a backdrop that has point light sources. As is sometimes the case for portrait photography, you need to get in close for it to work, or alternatively settle for blurring everything out to get the effect.
In focus with the bokehtinator, and out-of-focus (larger here)
In the shot above I've taken a photo of a building downtown. Unless I got really close to the building, it was going to be pretty unlikely that I was going to get only part of the building in focus (custom lenses aside). However, if you throw sharpness out of the window, you can still get an interesting looking shot.
By turning off autofocus and manually racking the focus back and forth, you can experiment with exactly how big you'd like the effect to be. In the example above, we start off with relatively small shaped bokeh, but a nice sharp foreground. As the focus is racked, we get bigger, more impressive looking bokeh but the foreground goes out of focus.
Comparing cutout discs:
Cutout discs tested: star, recycle, cursor
The shaped bokeh is sharp - in particular, I do like how it turns otherwise plain-old background bokeh into sharp shapes, which (when the composition works) match a sharp foreground subject. I was also initially a bit doubtful about the sharpness of the cutouts when I first looked at the discs, but I'm happy to report that this wasn't a problem.
Impressions & conclusion:
One could easily argue that given the relatively simple nature of the kit, that you could build your own at home. If you're the kind of photographer that can do that, more power to you, but I'd say that then this isn't the kit for you. My feeling is that this kit is aimed at the photographer who just wants to get going with shaped bokeh and doesn't have the time or inclination to craft small cutouts.
It'd also make an awesome tool for portrait photographers who are looking to differentiate their work. As cheesy as it sounds, the provided good selection of cutouts means that you can quickly pick one out that suits the occasion.
In practice, I found that my shooting tended to consist of taking a few test shots on auto-metering and auto-focus, and then switching to both manual mode (for shutter speed) and manual focus. You also need to be mindful of the depth of field of the lens that you are using, and how a careful choice of both subject and distance from the camera will affect the result. As such, I don't think this kit is for the total beginner - however, I think an intermediate to advanced photographer would get a lot out of it.
If you fit into one of these categories, I'm going to go ahead and cheerfully recommend it.
[Udi is a DIY photography ninja and unlike my own clumsy attempts Udi has a knack for coming up with some elegant hacks.]
Star shaped bokeh from out-of-focus traffic downtown.
What's in the box:
The masters kit comes with five pre-perforated sheets. Four of these contain the shaped cutouts, and the actual 'bokehtinator', which is used to mount the discs. Another sheet folds into a little box for storing the discs when they are not in use. A rubber-band is supplied so you can attach the bokehtinator to the camera itself.
When you first punch the discs out, you might get a feeling that the plastic is a bit on the flimsy side; in particular the folds bokehtinator seem like they might tear. However, after a two days of of testing I was pleasantly surprised to find that by just being mindful of not pulling along the fold lines it is indeed quite sturdy.
Attaching the bokehtinator is relatively simple - the tabs are folded around the lens and held in place with the rubber bands. A clever part of this design means that the focusing ring is still accessible for use, as opposed to the DIY cap-based designs which would prevent this. One thing that I quickly discovered was that I needed to attach the bokehtinator with a good 5mm gap away from the end of the lens to allow room for the focusing mechanism to work.
Learning to work with shaped bokeh:
I used my trusty Canon 450D along with a f1.8 50mm nifty fifty. To really make use of the bokeh effects, you need out-of-focus light sources. If your lens has a good, big depth-of-field than you might be disappointed - as the instructions in the kit say, for this to work you need the aperture wide open (i.e. low f-stop).
The sweet-spot for usage (as I understand it) is with portrait photography with a backdrop that has point light sources. As is sometimes the case for portrait photography, you need to get in close for it to work, or alternatively settle for blurring everything out to get the effect.
In focus with the bokehtinator, and out-of-focus (larger here)
In the shot above I've taken a photo of a building downtown. Unless I got really close to the building, it was going to be pretty unlikely that I was going to get only part of the building in focus (custom lenses aside). However, if you throw sharpness out of the window, you can still get an interesting looking shot.


By turning off autofocus and manually racking the focus back and forth, you can experiment with exactly how big you'd like the effect to be. In the example above, we start off with relatively small shaped bokeh, but a nice sharp foreground. As the focus is racked, we get bigger, more impressive looking bokeh but the foreground goes out of focus.
Comparing cutout discs:
Cutout discs tested: star, recycle, cursor
To see how it affected the technical aspects of shooting, I tested with three representative cutouts. I used the star, which provided a relatively simple shape and large aperture. The recycle symbol had a lot of detail and a smaller aperture, and the cursor symbol had and off-centre aperture.
The first thing that I found was that the multi-point autofocus no longer worked with the bokehtinator in place. This wasn't a big deal; I set the autofocus point to the centre of the image, which seemed to work fine for the star and the recycle, but wouldn't work at all for the cursor cutout.
I also got mixed results with metering. I prefer to use centre-weighted metering (in aperture priority mode) on my camera, which worked fine with the star and recycle discs, but tended to over-expose with the cursor.
Top left: no disc, top right: recycle symbol, bottom left: cursor, bottom right: star
Once you get the camera set-up though, it's a bunch of fun. This is a great time of year to be playing around with this particular accessory as there are lots of seasonal decorations to give you point sources for your bokeh.
The shaped bokeh is sharp - in particular, I do like how it turns otherwise plain-old background bokeh into sharp shapes, which (when the composition works) match a sharp foreground subject. I was also initially a bit doubtful about the sharpness of the cutouts when I first looked at the discs, but I'm happy to report that this wasn't a problem.
Impressions & conclusion:
One could easily argue that given the relatively simple nature of the kit, that you could build your own at home. If you're the kind of photographer that can do that, more power to you, but I'd say that then this isn't the kit for you. My feeling is that this kit is aimed at the photographer who just wants to get going with shaped bokeh and doesn't have the time or inclination to craft small cutouts.
It'd also make an awesome tool for portrait photographers who are looking to differentiate their work. As cheesy as it sounds, the provided good selection of cutouts means that you can quickly pick one out that suits the occasion.
In practice, I found that my shooting tended to consist of taking a few test shots on auto-metering and auto-focus, and then switching to both manual mode (for shutter speed) and manual focus. You also need to be mindful of the depth of field of the lens that you are using, and how a careful choice of both subject and distance from the camera will affect the result. As such, I don't think this kit is for the total beginner - however, I think an intermediate to advanced photographer would get a lot out of it.
If you fit into one of these categories, I'm going to go ahead and cheerfully recommend it.
12 October 2009

7 September 2009
Bay Bridge Bypass
[Prefix: A huge, enormous thanks has to go out to Margena Wade, (Community Liaison Officer) and other staff at the Bay Bridge project at Caltrans for giving me the opportunity to go out and look at the construction of the bridge. It's an amazing project on an enormous scale, and I've been enormously lucky to have had the opportunity to go out and have a look at it first hand :)]
I set out on Friday afternoon after work to have a look at the Bay Bridge bypass construction work first hand. Heading over on the trusty 108 MUNI, I scuttled about Yerba Buena and Treasure Island trying to get a few good shots. I nabbed a spectacular moonrise over the construction site:

...as well as a time-lapse with ye olde plungercam of the old bridge section being rolled out, as well as a timelapse of the moonrise :)
However, I was lucky enough to be invited back to the island for a tour of the site on Saturday evening - and it was absolutely spectacular.
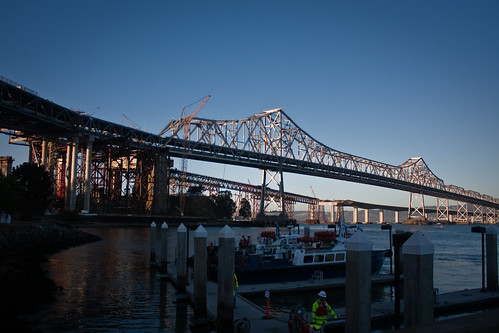
This is the boat pier on the East side of the bay bridge construction site. Here a service connected the two Caltrans command centres at Yerba Buena island, and it's from here I got the awesome ferry ride out on the water to have a look at the entire span of the bridge.
On the left hand side of the image you can see the new section of the bridge completely rolled into place; when I arrived on Saturday evening it was being worked on by engineering crews who were working on a pile of verification and connection tasks.
The bypass weighs about 7000 tons (!) and was assembled 50m up in the air and slid into place on rails. I asked about what it takes to overcome that sort of inertia to get it moving, and the answer was lots of hydraulics and dish soap.
In the mid-ground on the right two-thirds of the image, you can see the existing Bay bridge; just behind it is the new bridge. For the majority of the distance, the deck is in a side-by side configuration. I believe that the current point where it is up to is named W2; from there until pier E2 (mostly obscured by the construction work) it becomes a deck suspended by a pylon, and after that it converts into a double deck configuration to enter into Yerba Buena island.
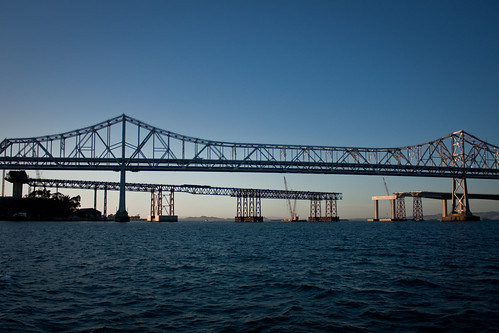
On the far left of the image, you can see 'falsework' construction leading up to pier E2; on the right, you can see the twin deck coming over from Oakland and pier W2. The falsework is in place so that the deck, which is normally going to be suspended from a pylon, can be constructed whilst the pylon is put into place. When the suspension cables are added, the falsework will be removed.
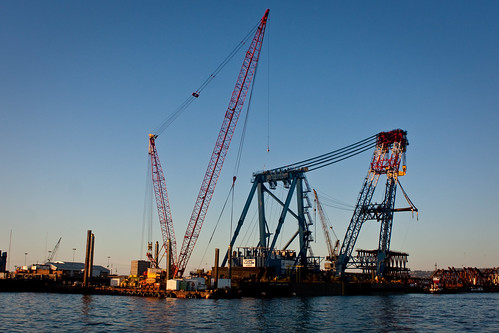
The Left Coast Lifter is one of the world's largest floating cranes, and was constructed specifically for the job of installing sections of the Bay Bridge. This behemoth is about 30 stories high (!) and after the job with the Bay Bridge is likely to be deployed elsewhere. Before construction it was used to lift a sunken WW II tugboat. Here you can see it parked at Oakland, just in front of some falsework that is going to be used to temporarily support the span of the new bridge.
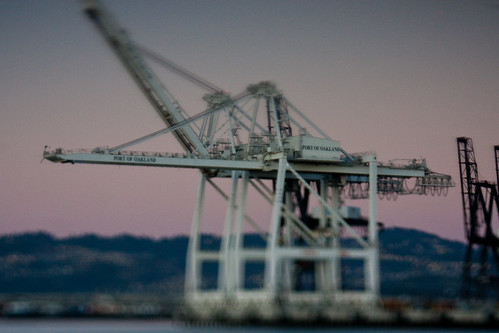
One of the many characteristic cranes lining the Oakland foreshore.
Inspection of the Bay Bridge revealed that a two-inch crack in an eyebar on the East span of the bridge; I'm pretty sure the crane and lift in the middle are near where the broken eyebar is. The crack means that the re-opening of the bridge may need to be delayed whist crews work overnight on fixing the problem.

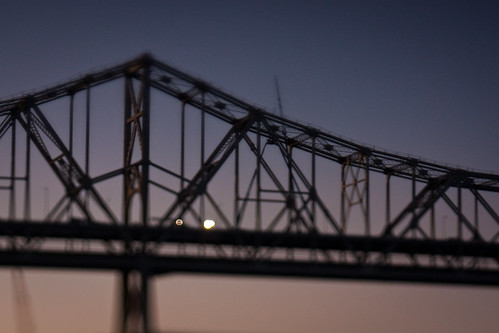
This is my favourite shot; the plungercam does all sorts of interesting things with smearing out point light sources. Golden hour at sunset is very, very kind to photographers in the Bay area summer :)
In the centre of the image you just make out the crane next to the newly discovered broken eyebar support on the bridge.
All in all, it was an awesome weekend :D The full photoset is here.
I set out on Friday afternoon after work to have a look at the Bay Bridge bypass construction work first hand. Heading over on the trusty 108 MUNI, I scuttled about Yerba Buena and Treasure Island trying to get a few good shots. I nabbed a spectacular moonrise over the construction site:
...as well as a time-lapse with ye olde plungercam of the old bridge section being rolled out, as well as a timelapse of the moonrise :)
However, I was lucky enough to be invited back to the island for a tour of the site on Saturday evening - and it was absolutely spectacular.
This is the boat pier on the East side of the bay bridge construction site. Here a service connected the two Caltrans command centres at Yerba Buena island, and it's from here I got the awesome ferry ride out on the water to have a look at the entire span of the bridge.
On the left hand side of the image you can see the new section of the bridge completely rolled into place; when I arrived on Saturday evening it was being worked on by engineering crews who were working on a pile of verification and connection tasks.
The bypass weighs about 7000 tons (!) and was assembled 50m up in the air and slid into place on rails. I asked about what it takes to overcome that sort of inertia to get it moving, and the answer was lots of hydraulics and dish soap.
In the mid-ground on the right two-thirds of the image, you can see the existing Bay bridge; just behind it is the new bridge. For the majority of the distance, the deck is in a side-by side configuration. I believe that the current point where it is up to is named W2; from there until pier E2 (mostly obscured by the construction work) it becomes a deck suspended by a pylon, and after that it converts into a double deck configuration to enter into Yerba Buena island.
On the far left of the image, you can see 'falsework' construction leading up to pier E2; on the right, you can see the twin deck coming over from Oakland and pier W2. The falsework is in place so that the deck, which is normally going to be suspended from a pylon, can be constructed whilst the pylon is put into place. When the suspension cables are added, the falsework will be removed.
The Left Coast Lifter is one of the world's largest floating cranes, and was constructed specifically for the job of installing sections of the Bay Bridge. This behemoth is about 30 stories high (!) and after the job with the Bay Bridge is likely to be deployed elsewhere. Before construction it was used to lift a sunken WW II tugboat. Here you can see it parked at Oakland, just in front of some falsework that is going to be used to temporarily support the span of the new bridge.
One of the many characteristic cranes lining the Oakland foreshore.
Inspection of the Bay Bridge revealed that a two-inch crack in an eyebar on the East span of the bridge; I'm pretty sure the crane and lift in the middle are near where the broken eyebar is. The crack means that the re-opening of the bridge may need to be delayed whist crews work overnight on fixing the problem.
This is my favourite shot; the plungercam does all sorts of interesting things with smearing out point light sources. Golden hour at sunset is very, very kind to photographers in the Bay area summer :)
In the centre of the image you just make out the crane next to the newly discovered broken eyebar support on the bridge.
All in all, it was an awesome weekend :D The full photoset is here.
11 August 2009
More photon-based shenanigans
Last weekend was a trip up to South Lake Tahoe, and it wouldn't have been the same without some unwarranted and needless geeking out.
I was keen to test both plungercam 2 and the time-lapse recording setup under some more challenging conditions out in the field.
I'm a huge fan of Keith Loutit and his use of tilt-shift for minituarisation, and I wanted to have a go myself:
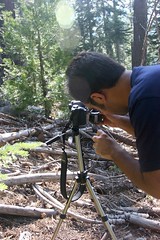
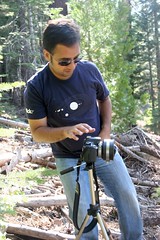
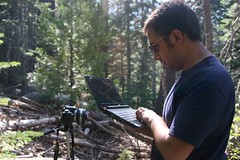
I carried a netbook, camera, lens and mini-tripod up on the hike around Emerald bay to get the shot. Chuck kindly took a couple of shots of me setting up the whole thing and running the capture, so you can get an idea of how (relatively) minimal the setup is:
On a less terrestrial scale, I also wanted to get a nice capture of stars in motion. Given that we were well outside of the city, I thought it was a a reasonable enough proposition - however, the moon was nearly full, so that did tend to wash things out a fair bit as soon as it rose. However, the result wasn't awful:
I used auto-levels to try to bring out the stars a bit, but it does tend to cause some odd colour artifacts - see the weird green hues in the second sequence above. Next time I think I'll try to control the levels manually rather than leave it to an algorithm.
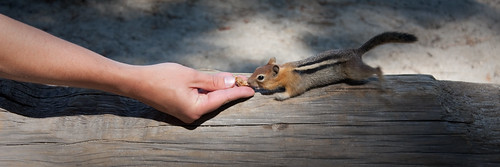
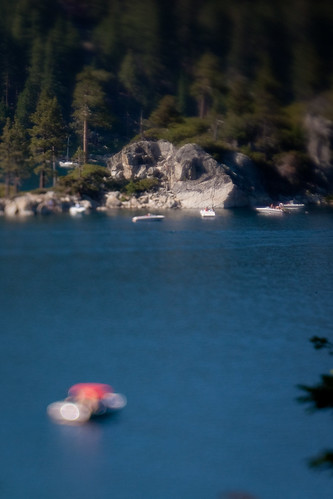
On the plain old 2D front, Tahoe yielded a few nice shots:
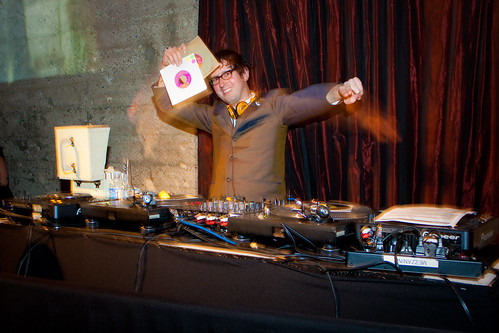
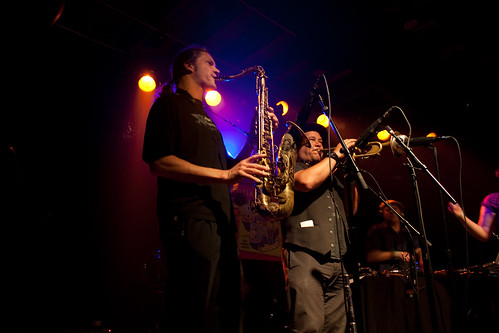
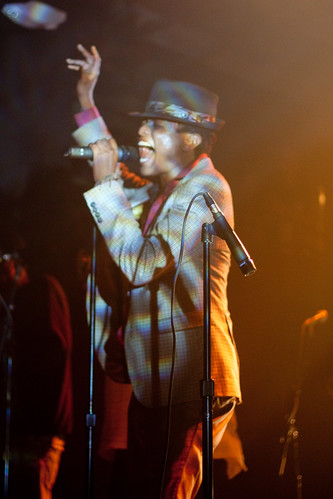
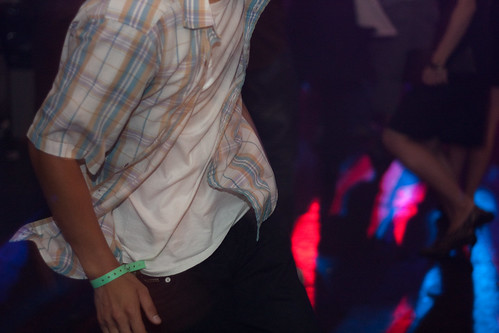
...and last Wednesday, I was helping out the San Francisco Bay Guardian again by taking some candids at the annual Best of the Bay party downtown. Good time had by all :)
I was keen to test both plungercam 2 and the time-lapse recording setup under some more challenging conditions out in the field.
I'm a huge fan of Keith Loutit and his use of tilt-shift for minituarisation, and I wanted to have a go myself:
I carried a netbook, camera, lens and mini-tripod up on the hike around Emerald bay to get the shot. Chuck kindly took a couple of shots of me setting up the whole thing and running the capture, so you can get an idea of how (relatively) minimal the setup is:
On a less terrestrial scale, I also wanted to get a nice capture of stars in motion. Given that we were well outside of the city, I thought it was a a reasonable enough proposition - however, the moon was nearly full, so that did tend to wash things out a fair bit as soon as it rose. However, the result wasn't awful:
I used auto-levels to try to bring out the stars a bit, but it does tend to cause some odd colour artifacts - see the weird green hues in the second sequence above. Next time I think I'll try to control the levels manually rather than leave it to an algorithm.
On the plain old 2D front, Tahoe yielded a few nice shots:
...and last Wednesday, I was helping out the San Francisco Bay Guardian again by taking some candids at the annual Best of the Bay party downtown. Good time had by all :)
Subscribe to:
Posts (Atom)