New visitors: the updated DIY tilt-shift lens tutorial is here: http://cow.mooh.org/projects/tiltshift.
In it, I've got a comprehensive guide to how tilt-shift works, along with a guide to using existing 35mm lenses to build DIY tilt-shift lenses.
[Edit #0: hi to everyone from hackaday, crunchgear, makezine, lifehacker, and wired! And Photojojo too :)]
[Edit #1: Some new results with Plungercam 2 here; earlier video experiments with tilt-shift here and here.]
[Edit #2: Those who are looking for the reasoning behind the project and details on how to get parts might want to check out the write up for the original plungercam first.]
[Edit #3: Need a tip with building the plungercam? Want to collaborate on a project? Don't hesitate to drop me an email]
[Edit #4: See some of my other DIY projects (plungercam 1, iPhone SLR lens adapter, papercraft etc) here]

The original plungercam that I built earlier this year has been an absolute joy to use. However, the original design has a couple of problems.
1) The mounting mechanism to attach it to the camera uses a plastic body cap, which was never designed to hold much weight. As a result, the teeth on the cap have been slowly disintegrating under the weight (see inset, above). Mounting the lens has now become pretty unreliable.
2) Usage - there is a lot of fun to be had by forcing the user to tweak the focus by hand, meaning zero repeatability - no two plungercam shots will ever be the same. However, this means that it is unusable for time-lapse video applications, where it is important to keep the lens in the same place between shots.
I'll go through the construction of the dead simple Plungercam 2, which addresses the above two issues. It's worth pointing out at this stage that this is the first step in getting the plungercam to behave like a proper tilt-shift lens. Currently it only really handles tilt, so, strictly speaking, it's role is more like a very quirky selective focus mechanism than actual perspective correction.

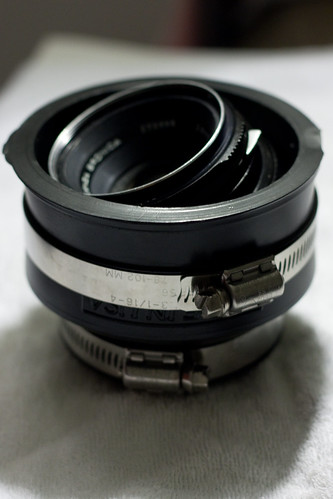
Plungercam 2 keeps in the spirit of the original plungercam by using cheap plumbing equipment and affixing it to precision optics. This iteration eliminates the need for glue altogether, so all the optical components can be easily taken out and re-used elsewhere.
The main component is a rubberized pipe coupling, which I got for $7 at the always awesome Center hardware. The two adjustable steel bands will be used to hold the mount and lens securely in place. This particular one is two inches on the narrow end, and three on the wider end.
To fix the problem with the body cap mount teeth fraying, I decided to replace it with a T-mount T-mount adapter. I picked up the one I'm using for $3 from one of the closing Ritz camera stores.
I'm re using the $12 (from ebay) Zenza bronica medium format lens that was in plungercam 1. Since this was only held in place using a metal clip, it was easy to take it out and re-use it.
Total cost: ~$22 :)
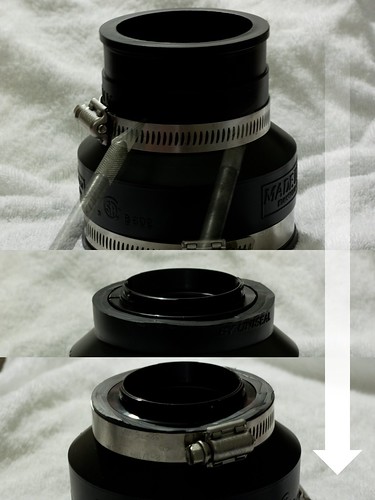
The narrow end of the pipe connector is going to be connected to the camera; to maximise the usability of the lens, we want the narrow end to be as short as is practical. The general idea is to put the t-mount adapter into the narrow end, and to use the pipe clip to secure it into place.
Slide the pipe clip as far along as it can go along the connector, and score using a hobby knife around the edge of it that is going to be attaching to the camera. Remove the clip, and cut along the score line (again, a hobby knife will do the job here) to chop off the top of the connector. Keep the cut as perpendicular to the surface as possible.
My T-mount adapter was a little than two inches on its external diameter, and the connector itself is designed with a two inch fitting on its narrow end. With a bit of careful levering, the adapter can be wedged into the connector. Whilst it is a good fit, it's a good idea to put the pipe clamp back on and screw it tightly into place. Last thing you need is the adapter falling apart when it is on the camera :P
To finish the adapter, place the lens inside the wide end of the connector, and adjust to get the tilt desired. To fix it into place, simply tighten the screw clip. To reposition, loosen the screw clip, mess about with the lens position, and try again.
The design works because the mount is rubber, and the lens size is just a little less than the diameter of its mount. The lens sits comfortably in the mount, and the adjustable rubber gives it room to move when you want to tilt it. The metal clip (when tightened!) ensures that the lens can be held in place. The field tests that I've done so far have shown that the lens is indeed held pretty solidly in place.
The main drawback is that it's not as interactive as plungercam 1, and it takes much longer to set up a shot. On the other hand, you can definitely use it for time-lapse captures, which was a goal of mine.
It's definitely still a work in progress (I still need to add a rack to more precisely control lens shift as well as tilt), but results so far are not too bad :)
link to video
28 comments:
phwoar! made it on hack a day! another life milestone =D
This f&^%ing rocks!
I love it.
My advice: sell them. I'm serious. I'd buy it yesterday.
How in the world did you get such a great deal on the lens? I'm looking on ebay and the cheapest I can find is $60! Still much cheaper than a TS lens, but far more than the $11.50 you paid. Has there been an upswing in purchases for DIY TS users???
Anyway, this looks awesome. I read about making your own in Make Magazine some time ago, but have finally decided to do it. I would use this for landscapes but also portraiture, including child portraiture. So I need something that won't take a lot of fiddling, since children aren't exactly known for their ability to sit still. I was thinking of using your first design but subbing in the T-mount to make it more robust. Would that work?
Thank you!!!
@Shana: yeah, it took a bit of looking on eBay to find the lens - it took about a month on and off of searching to find one under $50. I bought it off someone who was selling all sorts of assorted stuff, and they didn't seem to really know how much the lens was actually worth. It's worth looking for misspelled entries on ebay too.
Another good resource is keh.com, but you have to be pretty fast to snap up a cheap lens.
In regards to subbing in a t-mount into the first design - that's exactly what I'm going to do too, and I'm pretty sure it'll work out fine. Let me know how it works out - I'd love to see the finished build :)
Excellent, thank you so much for your feedback. I'm not known for my patience, so I may just spend the $60 and be done with it!
I'll go forward with the t-mount, and definitely drop you a line to let you see the results.
And if you'll entertain another stupid question ... since the lens isn't in contact with the electronics of the camera (and isn't compatible anyway), how does one control the aperture? In the Make article (with a somewhat similar design to yours) it said the apertures would still work, but that doesn't make sense to me. I would probably want to leave it at 2.8 all the time anyway, and I think that's what the lens defaults to, so do you just stick it on and go, and know it will be at 2.8?
Thank you!
@Shana: since the electronics or mechanics isn't hooked up, aperture has to be controlled manually. Some lenses allow you to select an aperture, with a button around the focusing ring. I've marked it out using a note (roll over the mouse on the image) here:
http://www.flickr.com/photos/captin_nod/3380908635/in/set-72157615745518237/
You might be able to select the aperture using the ring, then hold the button down using a tight rubber or something similar.
However, other lens designs may implement this in different ways, so chances are you'll have to improvise, which is half the fun :)
Personally, I love to shoot plungercam with the aperture way open (I usually don't obsess to much about image sharpness for plungercam shots), but I can see how that wouldn't be for everyone :)
Got it. Thank you so much for all your help.
I have been ogling Plungercam 1 for a long time. I haven't been able to repeat the feat simply because I couldn't find a similar type of bellows. But the one you used for Plungercam Mk 2 may well be available from the hardware store here.
Any particular reason why you went for the T mount? Or did you just happen to have it lying about? :)
@RML: the t-mount is just much, much stronger than the body cap. I used the plungercam pretty heavily over the period of a few months (see here) and the teeth on body cap itself just started to disintegrate under the load.
The t-mount is made of good, solid machined metal so I'm expecing that it won't have the same problem.
Thanks. I ordered a T mount just now. :) Tomorrow I'll be on my way to the hardware store.
wow, too cool, thanks for taking the time to share, truly inspirational!! all the best!!!!
Completely brilliant! Love the effect you get.
Looks good!
The first version was the usual hold the lens stuff, but now it looks better useable. Good Idea!
Because I'm using a Hasselblad for my experiment, I had to find a strong enough mount to start with. For that reason, I decided to get the Hasselblad Microscope Adapter. Starting with it I should be able to proceed from there without issue. But I'm glad to have finally gotten around to looking up what a plunger-cam is, to have a better idea of how to complete my project.
Xavian-Anderson Macpherson
ShingoshiDao
I just had to leave this update to my work on this project. I've just won a TOTALLY INSANE lens from eBay. It's a Minolta DLP 1.5-2.5:1 projector lens. It measures 15" long and 7" diameter. I won't post any links here, since they will disappear after a while. So just look up the lens in any search engine:
http://www.google.com/search?q=minolta+dlp+%221.5-2.5%3A1%22&ie=utf-8&oe=utf-8&aq=t
Xavian-Anderson Macpherson
ShingoshiDao
I just got my Minolta DLP Projector lens! It's so F'ing BIG, it's CRAZY!! It's about the size of a 300mm F/2.8 or maybe even larger. When I hold my Hasselblad body directly up against the rear end of the lens, I can focus the image in the viewfinder. Although there is some vignetting. But what I really got this for is my 2/3" CCTV camera. There won't be ANY vignetting when used in that application. And the image will be incredibly bright. I only have to determine the mounting thread size of the lens now. It looks to be somewhere around 4", with a 1mm pitch. I think it may be the standard 4" projector mounting thread, like what I have on another lens for projectors, 101.6mm. I'll definitely be looking for me of these lenses!
Xavian-Anderson Macpherson
ShingoshiDao
How big is your lens? I bought a Mayima 80mm f/2.8, and its outside diameter is about 2", roughly the same as theT-mount. I bought a 2" to 3" coupling, but the 3" end is way too big for the lens, even if the lens is inserted at an angle. I haven't cinched down with the clamp yet, but I'm not sure I can get it small enough.
@gthorne - an option is to simply pad the inside of the 3in end with rubber sheeting - I've seen a couple of plungercam 2 builds that have done this for lenses that are too small.
i need to ask. what kind of lens suitable for this project? my nikon 50mm 1.8d can work with this?
@AikoKanami - not with this particular design. However, on my new tutorial, here: http://cow.mooh.org/projects/tiltshift/
...I've got details on how you can adapt an existing 35mm lens to build a DIY tilt-shift lens.
hi i've a question to ask you.
i found the bronica 75mm f2.8 lens its like...few hundred, and i was thinking what if i use the other lens that was on the other DIY tilt lens ? would it work ?
1. Minolta MD 28mm f2.8 manual focus lens
2. rubberized pipe coupling
3.T-mount adapter
will that work ?
my email: chauvinli@hotmail.com
anyone feel free to reply, Thanks heaps !
Brilliant design! Thanks for sharing. I've followed your instruction with exactly same parts that you've used. However, my plungercam 2 cannot focus at infinity. Does yours have the same issue?
@Jiang: I think your problem is that the lens is probably not close enough to the camera body. What is the dimensions of the pipe coupling that you are using?
I've thought about the same reason. What puzzled me is that I used the same pipe coupling you've recommended, a 2"X3" flexible coupling. I also cut the narrow end as short as possible to accommodate the pipe clamp.
I've thought about the same thing, which is why I asked you if you had similar issue. The pipe coupling I used is same as the one you used in the tutorial, 2" X 3" flexible coupling. Also following your recommendation, I've cut the narrow end to the shortest possible to accommodate the 2" pipe clamp.
I only have a nikon d5000, I read on another comment that a cmos might not be the best. Will I be able to use this build on my d5000?
@speejack: The quality of the sensor shouldn't affect this build. The primary factor here is sensor size - the d5000 should be fine.
I made my own plungercam (is that an official term - should be!)
Have a look at http://www.flickr.com/photos/plusfoursmax/sets/72157632024494409/
your assistance is very impressive!
Post a Comment